
| cwave.eu5.org
Also see: http://www.angelfire.com/dragon/letstry cwave04 at yahoo dot com |
 Last updated on Wed Dec 22 10:24:57 IST 2010. |
|

Hardware concepts
So far we have talked about brainless robots. It takes no rocket scientist to understand that the brain of a robot resides in its software. To run any software we need a computer, and this raises three questons:- How do we put a computer inside a robot?
- How do we create the software?
- How do we download the software into the robot?
How do we put a computer inside a robot?
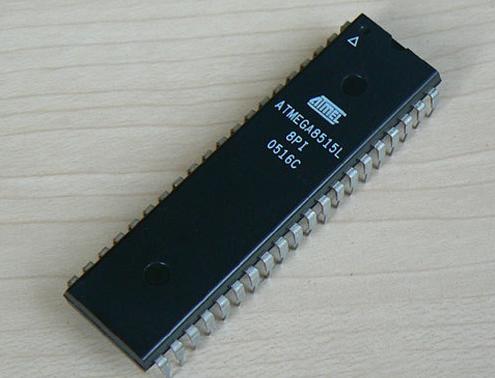
Surely a desktop or even a laptop is too cumbersome an object to put inside a robot. Neither do we want a robot to be connected with zillions of wires with a PC. After all, a robot should be an autonomus machine, faring for itself, without being a slave thethered to a PC. So we need a computer that is small enough to coneveniently fit inside a robot. Microcontrollers are just the answer to this need. A microcontroller is a complete computer (consisting of CPU, RAM and some permanent meomery) all on a single chip! Here is the picture of a typical microcontroller.
 |
How to create the software for a robot?
This is actually two questions packed in one. First, how to design the algorithm, and second, how to write the program and compile it. We shall address the first question later. For now here is the answer ot the second question. You develop the software in (a special dialect of) C/Basic in a PC/laptop and compile it with a special complier that is specific to the microcontroller being used. The tools to achieve this comprise our compiler tool set.Installing the compiler tool set
The exact procedure depends a great deal on your operating system (Windows/Linux etc) and what compiler tool set you plan to install. In this tutorial our tool set will consist of just two tools,avr-gcc and avr-objcopy.
If you are using Windows then look for the executible
files avr-gcc.exe and avr-objcopy.exe
in the net.
In Linux you just try to install the
packages gcc-avr and avr-libc like this
apt-get install gcc-avr
apt-get install avr-libc
Of course you need a working internet connection for
apt-get to work. Now type
avr-gccand hit "enter". If you get the response
avr-gcc: no input filesthen congratulations! Now type
avr-objcopyfollowed by an "enter". If you get a long usage message, then congratulate yourself once again!
Testing the compiler tool set
In the following exposition I shall assume that you have a working version ofavr-gcc and avr-objcopy installed in
your system. Create a file trst.c with the
following contents.
main() {
  int i;
  i = 9;
  i++;
}
Of course, this is a perfectly useless program (as it has no
input or output), but it is a valid program.
Now compile this file with
the following command:
avr-gcc -mmcu=mega8515 test.c -o test.outCheck that a new file
test.out has been created in
the current directory. (If the C program contains any syntax error, you'll get error messages.)
It is a machine language file in the so
called .text format. (No, it is not a text
file, .text is just a name!) This format is
not suitable for downloading into the microcontroller. So we need
to translate the file to the ihex (abbreviation for Intel
HEXadecimal) format using the avr-objcopy tool:
avr-objcopy -j .text -O ihex test.out test.hexThe resulting HEX file (saved as
test.hex) is an
ordinary text file like this:
:1000000010C02AC029C028C027C026C025C024C0CF
:1000100023C022C021C020C01FC01EC01DC01CC0E4
:100020001BC011241FBECFE5D2E0DEBFCDBF10E064
:10003000A0E6B0E0EAE8F0E002C005900D92A0363C
:10004000B107D9F710E0A0E6B0E001C01D92A036DC
:10005000B107E1F702D017C0D3CFDF93CF9300D021
:1000600000D0CDB7DEB789E090E09A83898389819B
:100070009A8101969A8389830F900F900F900F9029
:0A008000CF91DF910895F894FFCFAF
:00000001FF
Don't worry at this stage about what this gibberish means. We shall explain this later. Now we come to the third question in our list, the question which happens to be the most difficult to answer.
How to download the software into the microcontroller?
There are three steps:- you need to connect a special hardware to your PC/laptop,
- then insert your microcontroller into this hardware,
- run a special software in the PC, which will read your HEX file, commiunicate with the hardware, and download the contents of the HEX file into the microcontroller.
- Join a robotics course that will give you acess to a lab fitted with the necessary equipments. This is the best option if you can manage it, and in that case you'd probably not need this tutorial!
- Buy a standard protoboard, which includes both the special hardware, its special software as well as some other goodies (LEDs, pushbuttons etc). Many such protoboards are offered for sale in the net. If you can grab one of these and get it running, then you are well on you way to learning robotics. But the protoboards are often expensive, and may not be compatible with your system. Don't expect too much by way of customer support from the protoboard manufacturers!
- You can make your own hardware following the instruction given in many websites. The websites also provide the software necessary to commiunicate with the hardware. However, the software is almost always given as an executible (rather than as source code). So if something fails to work (which happens more often than you'd like) then all you can do is to post frantic emails to various online forums asking for help. There are some open source programmer softwares in the web (e.g., ponyprog, AVRDude, AVRprog) but they are much too complex for a newby to debug in case something fails to work.
- The last (but not the least) option is to make a very simple hardware and the not-so-simple software right from the scratch yourself. This is not exactly easy, but is itself an exciting project. But for this to work you need a PC with a parallel port (which is pretty archaic nowadays).
