[Home]
Table of contents
Here we shall discuss animation in AoI. Every object in AoI has a
number of attributes. Some of these are animatable, ie, are
allowed to change as a function of time. Animation in AoI means
specifying these functions. We shall discuss only three such
attributes here:
- Visibility
- Location
- Rotation
Visibility can be either on or off, nothing in between. It is
useful when you want to add details to the scene step by step, or
want to remove objects to allow a better view of the objects
behind them.
Location and rotation appear to be obvious, expect for one
thing. We often think of change of location of a rigid object as
a translation, and a rigid body motion that preserves the
orientation but keeps at least one point fixed, a rotation. Now
let us see this from the viewpoint of Aoi:
Every object in AoI has a registration point (whose position with
respect to the object is immutable). Location refers to the
position of this point, and rotation refers to the rotation of
the object around this point in reference with the default
orientation. Let's understand this with an example.
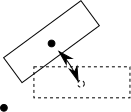
In the picture above we are rotating a rectangle around a point
near the bottom left hand corner. Mathematically this is a pure
rotation. But AoI will consider this as a mixture of rotation and
location change. The AoI definition of "location change" and
"rotation" has one important advantage over the mathematical
definitions of "translation" and "rotation". The former pair
commute, while the latter do not. Thus, in AoI, we can specify
the location change and rotation separately without having to
worry about which is done first.
The parent-child relation in AoI is a feature of the GUI only and
not of the animation engine. While animating AoI considers each
object separately and works out its animatable attributes
at each time point. Thus, if object $A$ is parent of
object $B$, then rotating $A$ in the GUI will also
rotate $B$ (around the registration point of $A$). But
just animating $A$ will not animate $B$. You need to
animate $B$ separately.
First you need to specify the attributes of the objects that you
want to animate. Each such attribute has its
own track. Each object already has a location and rotation
track associated with it. Since location and rotation are the
most basic attributes, AoI allows specifying them in more than
one way. The default for location is "XYZ in single track" and
for Rotation the default is "Queternion". We do not need to
understand what these mean right now. I mention these only
because, in case you accidentally delete the default tracks,
you'll know how to badd them back. If you want to add the visibility
track, do so as follows:
- Select the object
- Animation > Add Tracks to Selected Objects... > Visibility
What we shall now do is simple: for certain
time points we shall specify all the animatable attributes. Then
AoI will decide based on those few time points, the values of all
the animatable attributes at all time points. Mathematically,
this is just like interpolation. There are plenty of ways to
achieve this (eg, splines, piecewise linear, step
functions). Along with these AoI also allows the function only
approximate (as opposed to interpolate) these points. Anyway, do
not worry too much about al these right now. By default the
Location and Rotation tracks interpolate using splines and
visibility uses step functions.
So the question now is: How to specify the values at certain time
points. These time points are called keyframes.
Open the Score. Click on the time scale to set the current time
point. Or click the back arrow (to go to time 0). Make sure the
time bar is at that point. Bring the objects to the configuration
that you want them to be in at that time point. You do this using
the GUI. So you may use Null parets to rotate objects. Now select the object(s) whose
attributes you plan to set. No need to select Null parents. Hit Ctrl-Shift-A. This will select
all the attributes of the selected objects. Hit Ctrl-K to create
a keyframe, ie, save a snap of all these values and associate
them with this time point. Keep on repeating these steps as
many times as you wish: Click on the time scale, use GUI to
modify objects, select the objects, Ctrl-Shift-A, then Ctrl-K.
Ctrl-P will provide a quick animation. Though scrubbing may
actually be more handy.