[Home]
Table of contents
I recently came across a nice 3D modelling software called Art of
Illusion, which I shall call AoI for short in this short
tutorial. Here I shall tell you how I used it to create
photo-realistic images for a mathematical presentation.
The presentation was on Banach-Tarski paradox which is a rather
nerdy stuff. At one place I need to turn a ball twice, once along
the $x$-axis, and once along the $z$-axis y the same amount, and have to
demonstrate that these two rotations do not commute. That is, if
the rotations are done in the order "first $x$, then $z$"
you get one result, while doing it in the other order gives a
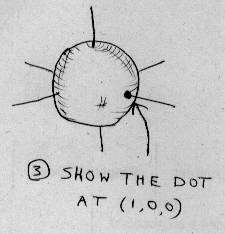
different result. In particular I need to show how the position
of the $(1,0,0)$ point changes. And then I also wanted to demonstrate the
effect of applying these rotations a number of times, say, in
some order like $x^2zx^{-1}z.$
It always helps to make rough sketches to visualise the end
product. I first wanted to show a ball like this:
I always like to build up a picture step by step as I explain the
need for each next step to my audience. So I want to keep the
first slide absolutely simple, just a ball.
Of course I need to show the axes before I can rotate around
them. I need only the $x$-axis and the $z$-axis, but I
do not want to make the $y$-axis conspicuous by its
absence. So my nextslide should show the same ball with the axes fitted:
Next I want to show the point $(1,0,0)$:
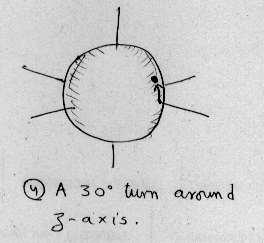
Now it is time to apply the first rotation. I could do it in one
shot. Or I could do it like a manual animation, where the
animation move one frame for one mouse click. I chose the
latter. Anyway here is the final form:
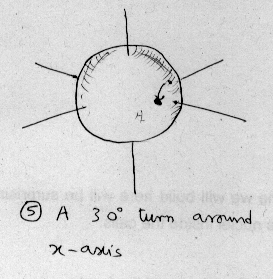
Now comes the second rotation. I decided to keep the current
position marked. The final position is:
At this point I could just start with the same rotations in the
reverse order, and show that the effects are different. But I
want to explain why the lack of commutativity is
"natural". Though both the rotations are by the same angle, yet
the physical distance travelled by the point are different.
This is because, the physical distance travelled during the second
rotation depends not only the angle
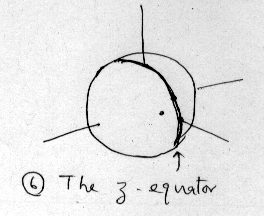
but also on the position of the dot at the end of the first rotation. To
demonstrate this I decide to add the circular paths along which
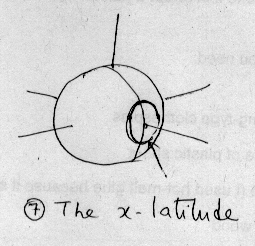
the point travels during the two rotations. First the $z$-equator
and then the $x$-latitude:
Now I show the effect of the rotations in the opposite
order. This does not require any new points to be added.
So I basically need the following "effects":
- Some objects (points, circles etc) appearing,
- Some rotations,
- A point leaving its footprint.
Points, circles have dimension less than 3, and so will not show
up in the final image rendered by AoI. So I have to use tiny
spheres in place of points and thin tubes in place of the
circles.
Rotations are easily done in AoI. But since I am rotating a
sphere which is a symmetric object, the rotation will not be
apparent to the audience. Only the point will seem to move over
the sphere. So adding a slight "roughness" to the sphere will
help.
The footprint of a point can be conveniently created by taking a
slightly transparent and darkened copy of the point.
So my images all revolve around the same set up, where different
details are added at different steps. In such a situation it is a
good idea to make a big picture containing all the objects properly aligned. Then
I can hide selected parts and take multiple renders.
I plan to preceed as follows to make the "big picture":
- Draw a sphere roughly.
- Use exact numerical values to make it perfect.
- Add a cylinder roughly to serve as an axis.
- Use exact numerical values to make it perfect.
- Make 2 copies of the cylinder to serve as the other axes.
- Use exact numerical values to rotate the copies to correct
positions.
- Add the big circle roughly.
- Use exact numerical values to make it perfect.
- Make a tube from it.
- Delete the circle.
- Add the small circle roughly.
- Use exact numerical values to make it perfect.
- Make a tube from it.
- Delete the circle.
- Add a tiny sphere to serve as the point.
- Use exact numerical values to make it perfect.
- Connect it to the ball, so that it rotates with the ball.
- Turn the ball by $30^\circ$ about $x$-axis.
- Make a copy of the tiny sphere.
- Turn the copy into a footprint.
- Turn the ball by $30^\circ$ about $z$-axis.
- Make a copy of the tiny sphere.
- Turn the copy into a footprint.
The above list is pretty long...at least for a novice like me. So
I would like to try out the main ideas first before spending time
with the clerical details.
It is easy to make an object roughly using AoI. But can I control
its alignment, shape, size etc precisely? Let's try making the
ball, a sphere of radius 1 placed with centre $(0,0,0).$
For this I try out the axes-making steps above.